Showing posts with label Frugal living. Show all posts

Tuesday, January 5, 2016

Homemade Beauty: Lip Balm making with kids


AR has always had chipped lips issue, many underlying issues for that. However, I also wanted something topical to use. We tried many different brands, both organic and non-organic but nothing seem to help really. Then I started making our own at home after the eczema salve we made for H. I have made many different variation until (I think) I mastered the ingredients blends to get the best results and here is my recipe.


Ingredients laid out for kids
Ingredients:
  1. 5 tbsp Beeswax
  2. 6 tbsp Coconut oil
  3. 4 tbsp Olive oil / Almond oil
  4. 4 tbsp Coco Butter 
  5. 2 tbsp Shea Butter
  6. Containers to pour into, you can find many options, we recycled these mini honey jars and previously used EOS old containers.
Instructions:
  • Melt ingredients 1, 2, 3 and 4 in a microwave (15 seconds intervals, because can get really hot) or a double broiler. 
  • Add shea butter at the end to the hot liquid to avoid it from turning into beads.
  • Add essential oils (keeping in mind what oils are safe for children) and vitamin E at the end because heat destroys their properties.
  • Pour into containers, let it cool and they are ready to use.
I  usually add a little shimmer for H using broken eye shades (which I save for this)
Final product. Notice the messy edges... I love the beauty of kids hands.
If I make Homemade body products for gifting or selling, I prefer not letting the kids help much to keep things clean. Beeswax can get quite messy when mixed with greasy ingredients, so be prepared for the mess when kids taking part.

Learning points
  • We also talked about, smiling is sunnah Hadeeth
  • Purifying intention to have beautiful smiles when making to please Allah SWT
  • Instill the idea of making your own things so you know what you are using. 
  • Be producers not consumers
  • For older children great math lesson on how much you save by this and how much one lip balm container cost.

For beautiful smiles!

Thursday, December 31, 2015

Homemade Beauty: Lip Scrub with kids


Kids made Lip scrub today with 3 ingredients that we already had in our Kitchen. It was a simple and fun project that they really enjoyed, especially the kids. I try to teach kids to make whatever they can at home and from scratch and whenever they can instead of always buying it as the first option. Instilling the idea of being producers rather than consumers is crucial at a young age. AR always has chapped lips so we made these lip scrubs for all of us. These have always helped his chapped lips. H of course love making it since it's a beauty product. Also teaching them that our beloved used to do things himself (Peace and blessing be upon him).

Kid's lip scrub
Here is what we used in the kids version of the scrub:
  • 1 tsp - organic coconut oil
  • 2 tsp - organic cane sugar
  • dash - organic cinnamon 
Adult's lip scrub
Here is what I used for the adults scrub:
  • 1 tsp - organic coconut oil
  • 2 tsp White sugar 
  • 2 drops lavender essential oil
  • 1 drop Eucalyptus
  • Dash of grated lemon 
Optional additions when making it for adults or giving as a gift:
  • Food coloring (gives it a LUSH touch)
  • Coffee
  • Brown sugar instead of cane sugar and white sugar
  • Olive oil
  • Honey

Enjoy the recipe and polish those beautiful smiles!

Stay tuned for more of our Homemade recipes for the whole family.

Sunday, July 5, 2015

Book Review: Ramadan books

Here we go... And InshaAllah hoping to stay. 

We are always looking for good Ramadan books. I want to share some Ramadan titles we are planning on reading this Ramadan.  The best part about them is they cost $0! I had put them on hold at  our local library. Alhumdulilah we got them a few days before Ramadan.  We try to make use of the resources we have, they help us stay more frugal!  


Monday, March 3, 2014

Life with a baby

Alhumdulillah  for older siblings and their tiny helpful hands.  Mashaa-Allah every  morning AR volunteers to feed baby S while I do some kitchen work.  And for some odd reason S is always more excited to eat with bhiya then Mama anyways.

I wanted to share some nutritious quick and easy baby food recipes ideas and tips. I puree fruits and veggies weekly and freeze them in ice cubes trays. I don't freeze any grains or seeds. Baby food is a great way to involve kids, they love blenders and pouring.

Every morning first thing I do is in a small pot I put 2 tablespoons of either organic brown rice, hulled millet (I use hulled because it's a lot quick and easier to cook), quinoa or brown rice flakes. While I prepare breakfast for the rest of the family the seeds are fully cooked. I just add a cube from the freezer of the puree while it's still warm, and it's ready to be served to our little man.

As he is getting older he is not interested in puree foods, he wants more texture and boiling fresh grains  and seeds adds that.  Sometimes I toss fresh fruit or veggies while the seeds still boiling and just mashed it slightly with a potato  masher.

I have done this all three of my kids and all of them have different reactions and tastes. So it important  to change things around depending  on individual  child's needs. These are no just easy to make but frugal too.

Here's our fresh pear and organic millet breakfast with a dash of organic cinnamon powder from this morning.

Sunday, October 21, 2012

Hajj Activties # 7, 8, 9 and 10


And for the last round of activities!

7. Educating ourselves before we educating our little ones: I listened to a couple of lectures to re-remind myself about the details and and virtues of Hajj and these 10 days. Here's one that I really benefited from when talking to the kids about the rituals of Hajj.

HAJJ WORKSHOP

8. Hajj ritual setup: By using the kids blocks, making a few things and printing Day 1 to 5 cards from Islamic Bulletin Board, we setup our Hajj table. This was by far the best teaching tool we had about Hajj. It was very hands on for them. So many people did Hajj on our table, AR took almost everyone he knows to Hajj. 


Make a Kabbah and learn the hitory though story telling. You can use cardboard box, construction paper. I played safe and painted a wood box black and added some gold to represent the kabah. it. Its very sturdy. Make some hujajj in ihram we added  their wives. 
Using the kids wooden blocks we made Mina and Jamarat. You will be able to find many things to represent these if you look around the house.
We used 2 big rocks from our rock collection to represent Safa and Marwa mountains 
The empty area is where Arafah is, the Hujjaj stand there and make dua. Muzdalifah is where the people are sleeping.

Felt sacrificial animals, the camel is missing.
This project is very easy, frugal and green. We try to keep things around our home as pure and simple as they can be, the goes for play, learning, cooking and cleaning.

9. Hajj Felt story board: Using our felt story board we did some hajj related stories and a life time journey of Hajj in our imagination. Unfortunately I was not able to take pictures and now we are out of town. It was a time consuming project for prepare for me, because I had to cut out each part separately.

10. Memorize and Chant the Talbiyah, Tahleel, Tahmeed and Takbeer : The Prophet SAW said: "There are no days on which righteous deeds are greater in the sight of Allaah and dearer to Him 

than on these ten days. So, intensify Tahleel and Tahmeed."
  
  • Tahleel - La IlaahaIllaAllaah "there is no one worthy of being worshiped but Allaah"
  • Takbeer -   Allaahu Akbar "Allaah is The Greatest"
  • Thameed -  Alhamdu lillaah "praise be to Allaah"

I pray and hope that you all find these activities a good idea and helpful teaching tools for you families inshaAllah

I pray that Allah SWT gives us all to the taweeq (ability) to benefit from these best 10 days. And also accept  all our acts of worship in these day. Ameen 

Hajj Mabroor to ALL the Hujjaj inshaAllah. 

Monday, October 15, 2012

Hajj Activities # 2, 3, 4, 5 and 6

Since we normally travel during the hajj break, I have to do Hajj based activities and learning before we leave. So we started last week and break starts in two days. I thought I would share some things we have been doing before we head out inshaAllah.

Its really important for us to make children feel a change in the home environment as we approach these important occasion, marked in our religion/life, i.e, Ramadan, Hajj, both Eid, the fast of Ashura and so on. It should be a special festival like feeling in the home.

I thought it would be best to start of from the foundation, which are the pillars of Islam and some other activities.


2.  Make a pillars of Islam model: We used cardboard rolls same as toilet paper rolls but a bit hard and sturdy, to make this. Our focus was Hajj, and inshaAllah I plan on covering others one topic at a time giving it its time to be absorbed into the kids.


3. Read a book about the pillars of Islam: We read over our "The Pillars of Islam" book. I recommend to every Muslim family. Its beautifully illustrated and written in very simple words. It comes with a partner book "The Pillars of Iman".


4. Learning Roots Pyramid Pillars: We made the Pyramid Pillars and talked about them a bit, again the main focus was Hajj.

5. Watch this video.  

Part 1


Part 2
6. Listening and singing these Nasheeds everyday. 

this

this 

And this our favorite <3! 


InshaAllah stay tuned for the last few.

Sunday, May 6, 2012

Introducing embroidery to children

As a little girl growing up in Saudi Arabia in the early 90's life was very simple. People found happiness in little things such as, going to the park, picnic, going for a walk, biking, playing with sand, and lots of crafts to explore. One of the things I got to introduced to very young was thread and needle and the wonders it can produce. I learned most of it on my own, through making mistakes and then correcting them. When we moved to Canada, it took me sometime to absorb the fast paced life and the lack of barakah in time. It wasn't long before I found myself running each day to complete one days tasks just like everyone else.

During summer vacations was when I was able to find time for myself and my hobbies, I would mostly go back to thread work. Till this day I love embroidery and bead-work. I love the feelings and memories of childhood it brings back for me. I always found thread work very therapeutic, I think that goes for all forms of handwork.

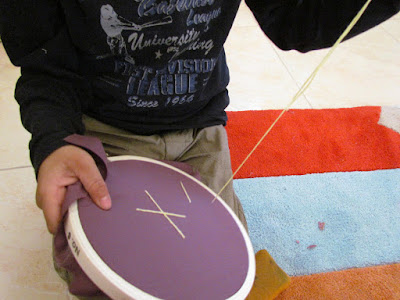
A few months ago I started an embroidery project and one evening when I sat down to work on it, AR came and asked me what I was doing and if he could do it do. I asked him if he would like his own embroidery loop and he was so happy and excited about the idea.

He helped me prepare the embroidery loop with a square cotton fabric piece.
We went on for 30 minutes, he helped me thread the needle every time. H give it a try too,  however I feel shes still too young and she pulls the needle too close to her eyes. We embroidery once a week, when she's asleep.


He has instead to work on the same piece. MashaAllah he's so proud of his hard work, he shows everyone and tells them "when ALL the yellow thread is finished we will cut and glue the fabric at the back and hang it on the wall!" I was impressed to hear his sophisticated idea. InshaAllah we will hang it, and it will be hung in our living room like some of their other art projects.

I feel it encourages children and builds their confidence and shows them their master pieces that they worked on with their tiny hands and creative minds are valuable and worth being hung for display on the walls. And that they give life and bring beauty to their house/walls and that they are not just for the study area or the fridge.

Boy or girl both should learn how to handle a needle safely and work with it. Since we very well know our beloved Prophet SAW used to sew his own clothes and mend his own shoes. So its important to encourage these essentials of life from the very start. Especially because a child is physically more involved in these activities its more satisfying and pleasurable to (most) children then being forced to or bribed to write.

The best part is... its so cheap!
This where we normally keep their paintings. Its hard to hang stuff on the walls here so we placed them on the shelves until we bring in the construction worker to drill in the walls.


Ramadan is around the corner once again!! Can you believe it??

Sunday, April 22, 2012

DIY: Kid's doll sling


A few months ago I made H this baby sling for her dolls, at first she didn't understand it but when I made one for AR and she saw him using it she started enjoying it a lot more. Its a super easy and fun project to do for our girls. I stitched this one with a pattern I have made myself. I also really like this easy tutorial at Progressivepioneer for a different style of a sling, maybe I'll give it a try when H is a bit older.

The whole thing cost $0! I used scraps left over from some other projects. The printed part is cotton and the black is jersey.


I have always wanted one of these baby wraps with both my babies but they were just too out of budget for us both times. Plus we got 3 of those backpack carriers, so we just used that despite the fact I did't really like them. Now that its so worn out, we might get this wrap. Simply love them! I love how the baby has such closeness to the mother/parent compared to the backpack carriers.

Has anyone used one of these baby wraps? How was your experience with them?

Thursday, March 15, 2012

DIY: Baby Doll


I have always wanted to these German dolls (also known as Waldorf dolls) for H, they are very expensive, they cost $130 to $250 a piece. I love this one from Etsy and this one from Nobby Organics.

A month or so ago I had a newsletter in my email about a Doll Making workshop in London Ontario offered by Waldorf in March, for only $95!! Its cheaper then the doll itself! I would love to attend this workshop and make my own dolls for my kids and relatives. Check it out here, if you are interested in taking the workshop and live in Ontario.

Since I had made the felt puppets for story time for the kids (will share inshaAllah), I thought, why not try making a doll. I looked up some tutorials and made my first handmade doll for my doll!! Of course I didn't have all the things needed and neither do I have craft store like Loomis or Micheals to ran to for crafty needs. This was a project that made me pull out my creative side and I was able to complete this doll making project, Alhumdulillah. We are officailly becoming producers from consumers.

Here is how I made in a few steps:

I used a old skin colored t-shirt of mine  from our donation box and  cut out the arms  separately,  torso and legs together and a big circle for the head. I stuffed an old sock of H, (small size) with the filling. and tied it close, and then I tied a strong thread in the middle of it form an head. You can see a curved in line by the eye area. I then cover it with the skin color fabric. If you can get the proper equipment, it come with a tube for the head, which works great and doesn't bunch up at the back. I stitched the arms and body on the machine,  and the kids helped me stuff the whole thing. They are in love with it.
Stitched it all toegther, arms, then the body. Its a very easy project if you have little bit of back ground in stitching you can do it.  It took me total one hour, and i did it over 2 days, and ofcourse the kids were a great help so I had to slow down for them, they stuffed the doll for me, mashaAllah.

Took this old dress of H form the donation box and cut out 2 dresses for H's dolls.


 It cost me $0! and my little doll is so happy with it mashaAllah. Homemade toys can be super frugal!


Wednesday, December 14, 2011

Our home-activities these days

Aside from AR's school, his tracing practice, most of our time is just spent on creative and imaginative play. I have always been a big advocate of arts and crafts as one of the most important tool for young children to learn through. Some mom's have said to me that we don't have time to do too much crafts with kids or some say they just can't stand the mess! Well if one plans on having children, mess is part of the package.

I would recommend this wonderful book to all homeschooling mommy's and also non-homeschooling to encourage them to think of "Art" as an important part of learning and growing. InshaAllah this book will help you all to look at Art in a different way, it will help you see how art promotes critical thinking, problem solving, gives confidence and creative thinking. This book has helped me as much as I found the authors techniques working with my children.
Susan Striker is the author of the famous book "Anti-coloring Book", 200,000 copies of it book have been sold.
I would also like to clarify the concept of art, art doesn't just mean painting on a canvas. When the word 'Art' is used in the concept of learning, it can consist of anything that promotes creative thinking. Like for instance, knitting is an art, sewing is an art, wood work is an art, so on.

These are some things that have been keeping us busy at home.

  • Knitting and crocheting - When I was young I knew how to knit, crochet and also use to make latch hook projects. However, its been years since I had done anything of this sort. I think it was also because when we moved to the west, these things are "grandma's things". Very few institutes and parents encourage  these activities in the west for their children. So for now we are all learning together and will share some of our projects.
  • Mud
  • Weaving - is also another fun activity we are practicing and learning together
  • Lazure wall painting - ALL kids have a dream to scribble or paint on the wall. So here is a great painting techniques, which is safe for children of all ages and they love it. InshaAllah we will be converting one of the Rawdah's wall into a children's masterpiece. (Will post about it later inshaAllah)
  • Small sewing projects
  • Clay
  • Play-stations/stands - We made play-stations around the Rawdah, so they spend sometime on each one.
  • Canopy - We are in a process of making a playstand with a canopy, but for now we are using their igloo tent as a canopy.
  • Nature's touch - We have been renovating their playroom and Rawdah and we tried to add a nature's touch to it. InshaAllah we will be sharing the picture soon.
  • Beeswax modelings by stockmar - It's fun to play with, smells nice, its natural and it can be made soft easily and even I enjoy it. We also have stockmar's crayons, and they are really fun as well.


Wednesday, April 20, 2011

Up-cycled: Flower Box


So I bought this box on sale for ONLY 6 riyals, slightly damaged, decided to up-cycle it by covering the burn on the lid.


This makes perfect storage for our future fabric flower projects, inshaAllah. 

I have a book on how to make different types of flowers from fabric, felt, ribbon and paper and some childhood experience. There are many wonderful blogs with tutorials teaching how to make flowers. Here is a link to one, she has a tutorial for a ribbon rose, you can use the same tutorial for fabric. The turquoise flower I made is the similar style but with a long piece of 2 inch wide fabric. Enjoy!

BTW, this is another project done sticking to the 20 mins a day rule, Alhumdulillah.