Showing posts with label Eco-friendly. Show all posts

Thursday, December 31, 2015

Homemade Beauty: Lip Scrub with kids


Kids made Lip scrub today with 3 ingredients that we already had in our Kitchen. It was a simple and fun project that they really enjoyed, especially the kids. I try to teach kids to make whatever they can at home and from scratch and whenever they can instead of always buying it as the first option. Instilling the idea of being producers rather than consumers is crucial at a young age. AR always has chapped lips so we made these lip scrubs for all of us. These have always helped his chapped lips. H of course love making it since it's a beauty product. Also teaching them that our beloved used to do things himself (Peace and blessing be upon him).

Kid's lip scrub
Here is what we used in the kids version of the scrub:
  • 1 tsp - organic coconut oil
  • 2 tsp - organic cane sugar
  • dash - organic cinnamon 
Adult's lip scrub
Here is what I used for the adults scrub:
  • 1 tsp - organic coconut oil
  • 2 tsp White sugar 
  • 2 drops lavender essential oil
  • 1 drop Eucalyptus
  • Dash of grated lemon 
Optional additions when making it for adults or giving as a gift:
  • Food coloring (gives it a LUSH touch)
  • Coffee
  • Brown sugar instead of cane sugar and white sugar
  • Olive oil
  • Honey

Enjoy the recipe and polish those beautiful smiles!

Stay tuned for more of our Homemade recipes for the whole family.

Wednesday, February 12, 2014

Product review: Substance - Nappy Rash Onitment

Bismillah


This post is mainly inspired by my life revolving around a baby these days. Its about a product I have been using for about 4 years now, and really feel I need to share its immense benefits we have had. Its like the only baby skin care  product I carry in my diaper bag. 


It works great for almost everything! I have used it for the kids on cuts, diaper rashes, sunburns, burns, mosquito bites, dry skin, irritation my daughter gets in her private because of swimming and for her . It is the only product we used on our son when he got circumcised . If you are like me and love good smelling things, you will simply love the way it smells.

It is however a bit on the expensive end but the way it works is a little goes a looong way. I have only bought it 2 times in over 4 years and still have enough to inshaa Allah last this whole year or more.


- We ask You O Allaah to protect our families for any evil in this World and the Hereafter, and to make them great thinkers and make us of those who fear You due to knowledge. Ameen.

Sunday, October 14, 2012

Hajj Activity #1: DIY Hajj Banner


Last week we made this Hajj banner to welcome the ten best days of the year. The theme of course is Hajj but I also added the Hajj Rituals. Every morning we talk about each place and see some pictures we have from our trips to Arafah, Mina and Muzdalifah. When we did Hajj last year we took AR with us to do Jamarat, so he remembers a lot of the things very clearly.


To make the banner I used felt, needle embroidery floss, a stiring and some templates. Then I cut out the Hajj route (Arafah, Mina, Muzdhalifah and Jamarat) and the sacrificial animals using templates I had printed. You can draw yours if you are good at it. I found the templates easier and faster! I used assorted sizes and colors for the base and glued the sacrificial animals and the Hajj route on them.


AR suggested to write the names of everything on it, of course Mama loved his suggestion and thought of embroiding the names on the base. H is in love with the little felt kaba we had to represent haram.


Banners can be made from any medium, paper, fabric, foam sheets in any design, I chose Grey, yellow, white, black and blue to match our living room colors. Banners can be fun, beautiful decor and educational, H has learned so much about the Hajj with us in the last few days mashaAllah through just being part of the morning Hajj discussion.


Sunday, May 6, 2012

Introducing embroidery to children

As a little girl growing up in Saudi Arabia in the early 90's life was very simple. People found happiness in little things such as, going to the park, picnic, going for a walk, biking, playing with sand, and lots of crafts to explore. One of the things I got to introduced to very young was thread and needle and the wonders it can produce. I learned most of it on my own, through making mistakes and then correcting them. When we moved to Canada, it took me sometime to absorb the fast paced life and the lack of barakah in time. It wasn't long before I found myself running each day to complete one days tasks just like everyone else.

During summer vacations was when I was able to find time for myself and my hobbies, I would mostly go back to thread work. Till this day I love embroidery and bead-work. I love the feelings and memories of childhood it brings back for me. I always found thread work very therapeutic, I think that goes for all forms of handwork.

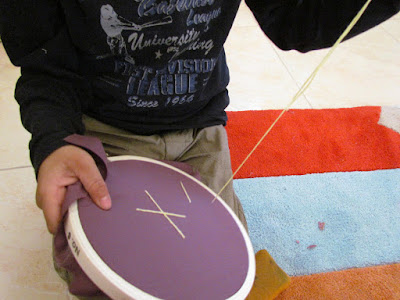
A few months ago I started an embroidery project and one evening when I sat down to work on it, AR came and asked me what I was doing and if he could do it do. I asked him if he would like his own embroidery loop and he was so happy and excited about the idea.

He helped me prepare the embroidery loop with a square cotton fabric piece.
We went on for 30 minutes, he helped me thread the needle every time. H give it a try too,  however I feel shes still too young and she pulls the needle too close to her eyes. We embroidery once a week, when she's asleep.


He has instead to work on the same piece. MashaAllah he's so proud of his hard work, he shows everyone and tells them "when ALL the yellow thread is finished we will cut and glue the fabric at the back and hang it on the wall!" I was impressed to hear his sophisticated idea. InshaAllah we will hang it, and it will be hung in our living room like some of their other art projects.

I feel it encourages children and builds their confidence and shows them their master pieces that they worked on with their tiny hands and creative minds are valuable and worth being hung for display on the walls. And that they give life and bring beauty to their house/walls and that they are not just for the study area or the fridge.

Boy or girl both should learn how to handle a needle safely and work with it. Since we very well know our beloved Prophet SAW used to sew his own clothes and mend his own shoes. So its important to encourage these essentials of life from the very start. Especially because a child is physically more involved in these activities its more satisfying and pleasurable to (most) children then being forced to or bribed to write.

The best part is... its so cheap!
This where we normally keep their paintings. Its hard to hang stuff on the walls here so we placed them on the shelves until we bring in the construction worker to drill in the walls.


Ramadan is around the corner once again!! Can you believe it??

Thursday, December 15, 2011

Book Review: Raising Baby Green

This is a wonderful book that all parents should have a or at least take a look at. It carries a wealth of information about pregnancy and early childhood. It has tips on how to keep your child away and protected from harmful chemicals, how to protect our families and planet (that Allah has given to us a blessing, test, and a trust). It has 300 best green baby products for you to chose from. It can be challenging to change our entire lifestyle at once so start with baby steps. As it is from the teachings of Islam as well to take things gradually and do what suits you and your family best, and the rest leave on Allah SWT.


Dr. Alan Greene was on parents.tv where he shared some easy and also cheap alternatives to conventional medicine for our little ones. We use and have used some of these remedies for our family, and all of us have benefited from them, big and small.  


Please email me at rawdahs@gmail.com if you would like to have a copy of "Raising Baby green"  I would love to share with you the benefit of this book :).


Wednesday, October 5, 2011

Just Label it

The only way we can make a difference in our lives and environment is by taking action. The link below requires that action from all of us. EWG {Environmental Working Group} and some other organizations started a campaign "Just Label it" demanding FDA {Food and Drug Administration} for a mandatory labeling of genetically engineered foods.

We all have the right to know what's in our food, more so as Muslims because our bodies are an amanah (trust) from Allah SWT and we are required to take care of them. 

Click here to sign the petition 

If you are not sure what exactly "genetically engineered food" means, watch this video.


If you are interested to know the whole story behind genetically engineered foods and whose behind it, then watch this documentary 


The Future of Food

Friday, August 19, 2011

Stainless steel baby bottles


We were walking down the baby food aisle at Whole Foods, and these sleek looking stainless steel baby bottles caught my eyes. We have always tried our best to avoid plastic bottles, we always got glass bottles but they would always break and I found them to be hazardous so... Alhumdulillah, for the BPA free bottles that took the place of plastic bottles that were recalled about 3 years ago. I still preferred stainlesss steel over any other type of bottle, when I saw these bottles I was so happy, and said to my husband we have to get these for our next baby inshaAllah!

It's an investment to make if you are expecting mommy! They are safe for kids, easy to clean, great for green living (eco-friendly)

You can check out there website for more green and safe products for your little ones :)  Organic Kidz

Thursday, April 28, 2011

DIY / GIY storage bins

Living in Saudi Arabia I really realized the value of recycling and decomposing facilities that are available in the west. I pray they implement this over here too soon inshaAllah! Although, however, with the recycling system we also tend to recycle a lot of stuff that we can easily re-use one way or another. Today, I will share with you, how I have reused / up-cycled sturdy boxes from things we bought and turned them into storage solutions and homes for varies items. Its always convenient, easy for children and their Baba! to access items when they know where something belongs, keep things from mixing and getting lost.

You will need:
  • Recyclable boxes of different sizes
  • Scissors
  • Contact paper or fabric. We used fabric contact role, which cost us about $7 for a giant role. I was not too particular about the color and design, because the nice design ones were TOO expensive.
  • A pen for marking
  • Decorative ribbons and flowers (optional)
This is a great way to instill eco-consciousness in children as well from a young age. everything doesn't need to be bought. They can even personalize their own storage bins.

For the steps... I will let the pictures do most of the talking.


Thursday, March 31, 2011

Popsicle Labels


On the bookshelf I used colored-popsicles and wrote on them with permanent marker. This way all the subjects remain separate and easily accessible. I have all math related books, workbooks, activities and puzzles in one shelf and so on.


I use this "paper tak" to stick things on the walls and things. I like them more then tapes or double sided tapes because it doesn't effect the walls/leave marks on them. They even stick Bristol Boards!!


What are some ways you label your items at home for your children and adults? 

Saturday, March 19, 2011

Goop!


Kids love Messy play so... we made Goop! Both the kids had a great time, even I had a great time playing with them and watching them. Its really messy! and loads of fun. I let them get there hands and feet involved so it turned out to be a great experience for them. Do give it a try, but remember it wil require some good cleaning up afterwards.

What you will need: 
  1. 2 cups corn flour
  2. food coloring (or you can use the natural dyes)
  3. water (add until you get the desired consistency)

Instructions: 

Mix the food color with the water and mix it with the c.flour. Keep adding water until you like the consistency of the goop...make sure to not make it watery!

Tuesday, March 15, 2011

Home lamination

I used to home laminate sheets and book marks with the clear vinyl book covers aside from just covering books with them. They would do a great job for me but now with kids I don't find them too durable so, I started home laminating. It very simple, easy, quick and cheap!

What you will need:

  1. Laminating pouches/film (you can get laminating film in any size)
  2. Iron
  3. Two 10' by 13' bristol board 
  4. A safe place to iron
Instructions:

I will let the picture do the talking.

 Open the pouch, which will have 3 sides open and one affixed. Place the material that needs to be laminated in between the  laminating sheets. 


Gently close it making sure that they do not move and then carefully place the laminating pouch between the two pieces of bristol board. Now, simply iron on moderately hot iron setting (I had our iron on 4.5, it goes till 7). Make sure to start from the side that is closed to avoid any bubbles or bumps to form. IF...the iron is too HOT it will simply make the film to curl up...so the whole game is on getting your hand set on the right temperature.
After you are done ironing...be very careful because it will be hot, give it a minute to cool and get hard.


Our finished product cut.


We had many other things laminated...

Did you know?!?

That... on laminated sheets you can also use WHITE BOARD markers! It works great for checklists, daily schedules, chore charts, GROCERY lists and reminders. You don't have to worry about wasting paper, recycling and it also eco-friendly (if you get the biodegradable laminating film/ pouches) :). Isn't that great??

I know some of you may be thinking right now...why waste so much time?...why not go to the stationary and get it done! Here are some reasons I do it at home

  1. It ACTUALLY takes less time to do-it yourself at home then to get yourself (a muslimahs that could mean hijab, abaya, or even niqab) and the kids (1, 2, 3, 4) ready.
  2. KIDS will love it... Children tend to like and feel attached to things that they see done in-front of them. Its a great learning experience.
  3. If you have older children it could be a great practice for them to iron.
  4. Its a great creative outlet...you can laminate leaves, make bookmarks for gifts, make labels, laminate a great art work of you child to preserve it and many other things.

Fuzzy science experiment


We also used the left over beetroot water for another fuzzy experiment. After we were done the experiment I used the vinegar and baking soda mixture to clean the kitchen sink and the tap.


Homemade play-dough dye


Forest berries (color and smell), turmeric with mango essence, green tea leaves and beet root.

Yesterday I was boiling beetroot for my daughter to eat. Since I was young I use to love the beautiful color of beetroot. So, while it was boiling I thought why not use this water to make PLAY-DOUGH! it would make a like a natural food dye. So I followed the play-dough recipe and made the play-dough. It turn out awesome! It gave the the play-dough elegant twist! I also added rose water to make it smell pleasant.

Beetroot...SubhanAllah... isn't the color just sooo AMAZING!! NO artificial dye could be compared to this!!

Add caption
After this I wanted to see if I could come up with more natural dyes. I could only think of Turmeric and strawberries. So I went on the net and guess what I found!! this awesome blog "Mini Eco" she has the most amazing ideas! She has a fuzzy experiment that I had posted about earlier as well (with better illustrations of-course). I am in love with her ideas (Allah yahdeehaa), can't wait to try them. I really enjoy Eco-friendly and toxic free things for the house and kids

Go check out the blog!

Please share any ideas you may have!

NOTE: in her recipe she says to cool the dye water, I poured it hot into the dry ingredients, it turned out great...make sure to knead it well.


Saturday, March 12, 2011

Crayon Hockey Pucks!


We made these chunky crayon hockey pucks. Why they might be good for you to try??
  1. They are lots of FUN for the kids  as they watch them melting
  2. A little science experiment about how heat melts an object
  3. Great color mixing experience for them to watch
  4. Amazing for the tiny toddlers hands
  5. No wasting those tiny non-handleable broken pieces of crayon

What you will need:
  1. A muffin tray
  2. Aluminium foil
  3. Broken/small pieces of crayon 
  4. A napkin with  little oil to slightly layer the foil with oil. (you can also use oil spray)
Place it in a warm oven not HOT. After melted, let it sit until its cool and hardens. 


Ta da!


Sunday, February 27, 2011

Yogurt Painting

We did yogurt painting! both the kids loved!! It was initially suppose to be for toddler activity for H but AR really wanted to do it too so he did some too.

Four teaspoon of yogurt with a drop or two of food coloring 


What you will need:
  1. Yogurt
  2. Thick paper, cardboard or bristol board
  3. Food coloring
  4. And some cute toddler hands!!
This is a wonderful activity for the toddlers and its safe, they can lick their fingers!