Showing posts with label Creativity. Show all posts

Saturday, July 4, 2015

InshaAllah we want to start again

Assalamu Aalaikum wa rahmatullahe wa barakatuhu


InshaAllah we are planning on being back on blogging, been MIA for a while, Alhumdulilah. We have been doing a lot of "living" learning!  We learned a lot about Allah's amazing plans. His Divine Decree, Love and Mercy that surrounds us all the time. We are indeed blessed, blessed and blessed over billions. 

So stay tuned InshaAllah. Be'iznillahi Ta'ala (with Allah's permission) 

Ramadan Kareem!


Sunday, April 15, 2012

Learning through play

I still remember when I attended the homeschooling conference in Toronto, I met a sister there who said to me "Oh, your son is still too young, don't worry about anything right now, just let him play till he's about seven. After seven is when children are actually able to learn, at that point you can start academic work with him." At first, what she said came as a shock to me but as I learned and researched more, the more I started to agree with what the sister had said. 

A lot of you have asked me what do I do with the kids all day anyways?? InshaAllah I will answer that one day! However, I would like to say one thing that are many AMAZING mommies out there that inspire me every single day one way or another. Some online, some in person and some by phone. Love you all and May Allah increase you (us) all in your (our) good righteous efforts and accept them from you (us). And chose our children for His deen Ameen

Until I post about what kinda stuff we do at home, here's a great article that will inshaAllah help those with little ones enormously and also give you an idea what we do around our home most of the time. The author talks the importance of learning though play.

Thursday, March 15, 2012

Knitting away...

I had posted before (Click here) about how we have been knitting and crocheting. So here are some or our projects we have been working on. I will also share some resources that are available to learn knitting and crocheting for beginners. Although I knew how to knit a little bit these tutorials were a great help for those who know how to work with yarn. We will also disscuss why and how we should introduce these skills to our little ones.

There are many reasons why we should introduce knitting to children. I feel its a skill that teaches a great deal of patience (I am talking from experience here!!). Children feel a great accomplished and confidence when they make something with their own hands (and so do adults). It also teaches problem solving, you make mistakes while knitting and you have to correct them with patience. Great for fine motor skills especially in boys. They make amazing gifts for children to give to family, friends and relatives. Its imporatnt to teach our children from the beginning to be producers then consumers as much as we can, also a it frugal.
However, before we start knitting with our children we might want to consider some steps to introducing knitting. I will inshaAllah share with you how I slowly introduced knitting and crocheting to my children step by step, we started in after we came back from our summer vacation, I had brought some tools and yarn back with me, Ihad purchase some stuff here too and it was easily available here too, Alhumdulillah.

1. Be a silent role model - Knit and crochet in front of them, and they will ask you what you are doing, take that opportunity to introduce the yarn, crochet hook or knitting needles. Children are more likely to do things they see parents doing. Whenever we go outside I keep the knitting (or any other) project with me in a drawstring bag, so when we are in the car I work on it while reciting/memorizing with the kids or just looking outside.

2. Getting comfortable - Let them get comfortable with the yarn and other tools by letting them touch them and experiment with them making sure you are with them to be safe.
3. Yarn craft - Doing yarn crafts, glue yarn on paper in different shapes,  paint with yarn, nailed wood panel yarn activity, inshaAllah I'll share this one later. Its a wonder math activity as well. You can also practice cutting yarn, we did a measuring cut yarn activity as well.
4. Introducing knitting - Now that the kids are comfortable with the concept of knitting and yarn, you can start knit with them. And the best way to start is finger knitting! No hooks or needles! From whatever research and asking around I have done, I found that the best age to start knitting with children is ages 6 to 7 but some children can start earlier, if the parents have focused on handwork at an early age. Wood weaving tools are also a great way to start knitting with young children
Here are some of the resources we used to start finger knitting. 
  • Knitting with kids
  • Famly Fun - DIY colorful Jump rope - we are working on this one right now together, we used some old tees and made yarn balls out of them we are still short on old tees. 
  • Video 1 - A boy teaching finger knittiing it was a good way to get him encouraged

  • Video 2 - Earthschooling finger knitting tutorial... love it how she does it with a story. Since AR is still young I keep him in my lap when we knit and we do it together, so far we have just made strings and he's still learning, it a great bonding time for us. We stop as soon as he says I am done, if we are singing then we get many stitches! MashaAllah its really fun!


Resources:

1. Online - Great knitting tutorial for beginners and those who know how to knit a little, uploaded by Cital 86, They have 12 tutotialsand they are very easy to follow

For crocheting these videos are very helpful


2. In person - Find a teacher who can teach you, knitting is very common here in Saudi, I was able to find someone who could teach me but it was not working out so I started using the tutorial I gave above. If you are living in North American you can find cafes and centers where they teach knitting, crocheting and felting and if you have kids they will teach them needle felting as well. Some even offer private class, all that will cost of course and its not always easy to go. Learning in person is a great way, if you can find someone who can teach you for free, that's great!  Knit-o-matic is a great place to start looking into for classes and more info.

3. Buying - In Saudi almost all stationary stores carry knitting tools and yarns. I buy ours from these two online stores, I bought some in summer last year, it has great variety and great prices. 

Here are some things we have made:

My first knit project, A purse for H. MashaAllah TabarakAllaha she loves it and takes it everywhere with her.
Ball for AR
This was a fun and easy knit project. I knit with a garter stitch 6 squares in 3 colors. and with a needle and yarn I hand stitched the pieces together same colors opposite to each other. What you see is the ball inside out, I left the yarn pieces un-cut, they added to the fill.
Turned it inside out and filled it with wool roving until it felt firm, and then stitched it close. The good thing about knitting squares and rectangles is that you can acctually put them together and make so many things about of them, rugs, floor chairs, baby blankets and throws.

A colorful handmade ball!

Baby Bennie for H's doll.

One of the string AR made, this was a gift for H from him.
I felt like making baby booties, so I started..

One completed and still working on the other one, thinking of giving it to preggo friend!

I am making more toys, a rug and a blanket inshaAllah its a slow and long process. I want to inshaAllah make this pouf for our living room (check them out) one day.


Saturday, March 3, 2012

The levels of Jannah

Today morning the kids and I were playing with their blocks while talk about Jannah and fantasizing about ALL the things we can have in Jannah. We also talked about how to get to Jannah and the different levels of Jannah. We never mentioned the different levels of Jannah before, so when I started talking about the levels and how if a family member will be in the higher level of Jannah, the lower level family will be raised to the higher level to be joined with them. AR was listening to me very careful and he was so amazed. We talked in great detail about it for about 20 to 30 minutes and then I went to do some work.

5 minutes later AR called me to show me this and he said


AR: Mama look what I made.
Me: mashaAllah really nice, what is it?
AR: These are the levels of Jannah Mama. The mother was on the lower level (the blue tower) and the little girl was on the higher level and Allah raised the mother to the girls level. They were both sad a bit before and now they got soooo happy to be together mashaAllah.  

I was speechless. My eyes filled with tears at the way he explained the process to me, lifting the mother with joy and raising her at the girl's level. MashaAllah TabarakaAllahu, he not just understood the concept but he gave it such and amazing visual from his imagination. I didn't do anything like this with him, it was all verbal with hand movements. It an amazing feeling to see your child grow in understanding step by step.

This really made me think something at very deeper level, by fitarah (nature) children want to learn about Allah and the Messenger (saw), Aakhirah, Jannah and Jahanm, good and evil, and they find a satisfaction in learning these concepts, a contentment, just as we do.

As parents when we are passionate about something, unknowingly we transfer it our children and they absorb our passion in themselves. So if we choose this duniya (life of this world) to be the most important thing to us, they will too and if we choose the Aakhirah (the hereafter), they will too. This absolutely doesn't mean we should become monks and go live in the forest! And have nothing to do with this duniya and the things in it! No, this is not what it means. We need to find a balance. We need this duniya to attain the Aakhirah and Allah swt's pleasure, but we should find a moderate path between the two and our inclination should be towards the Aakhirah more than the duniya.

O Allah fill our heart and minds with Your love and the love of the Prophet saw. And increase us in the desire to meet You. Teach us those ways by which we can instill this in our hearts and the hearts of our children and our spouses. O Allah protect us from the blazing fire and unit us in Jannah and raise our ranks in Jannah so we can unity in with our families and friends. Ameen Ya Rabb!

Saturday, February 25, 2012

DIY Tutorial: Monogram Pillow Case


Our 'Jummah special' for AR this past Jummah was a handmade monogram pillow cover made by Mama. I think this was by far the best gift he had gotten, his face was glowing mashaAllah, he took it from my hand a hugged the pillow and said "it says A  R mama... JazakaAllah khair" he was just so happy and excited about his new handmade by Mama pillow case.

The pleasure of taking time and making things to give your family and friends is priceless. And when done for  our children its truly worth seeing the expression on their beautiful faces "you MADE this for ME". When my husband came home from Jummah AR ran to him and said "Baba you know Mama made me a special A R pillow case..she made it last night even though she was sooooo tired". My husband and I were suprised to hear what he said, SubhanaAllah children are so caring and loving by fitra (nature)...its our duty as parents to nutrure this fitra they have.

I have always enjoyed makng my own things, I still have a skirt I had stitched in high-school. Last year I had started an etsy store named 'Handmadebits" alhumdulillah made a few sales but it was really taking from my time with the kids becoming a bit challenging from here, so I had to close it for the time and hope to go back up when Allah permits it inshaAllah.

InshaAllah if time permits I'll be sharing some of our previous handmade and future 'Jummah specials' and some tutorials.

Here's the tutorial for the Monogram pillow case. I didn't buy anything for this project, thats the best part!

You will need:

  • Fabric (used or new) for the pillow case or cushion. (I used a fitted  i had lying around)
  • GOOD fabric scissors
  • Printed fabric for the monogram (I used an old dress of H)
  • sewing machine!
  • Iron
How to make it:


Step #1
Cut out two same size fabric pieces (square, rectangle,  circle) . Then iron it, when I stitch I  iron my piece after every stitch, it really helps balancing the whole piece.
Step #2

On a piece of paper draw a picture of how you want your final piece to look like and then stick to it. Trace your monogram letters on a paper free hand or print then if you want it to look perfect. I simply drew them straight on the fabirc with a fabric chalk free hand (you can see the orange marks), it washes of right away. Plus I like the natural look it gives when done free hand.

Step #3
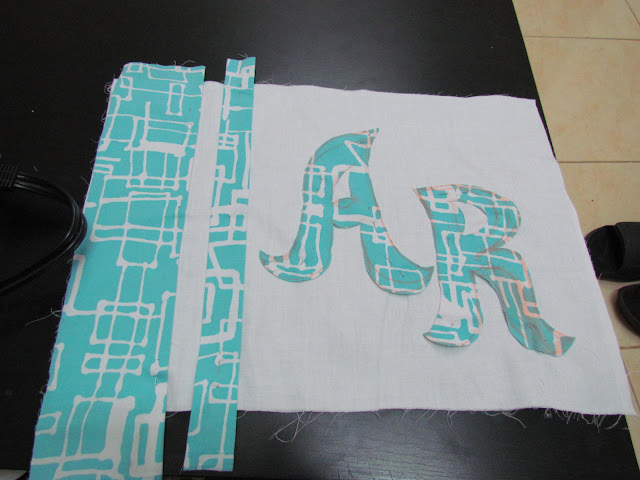
Cut and pin your letters on the right side of the fabric. Design it how you want - you can just put the letters in the middle and leave the rest plain or add stripes on any side to give it some accent it will look amazing regardless...because you made it. If you choose to use trips or fabric for accent make sure you pin it to the fabric as well.
Step #4 
Stitch the letters on by keeping the setting of the machine on the 'zig-zag' stitch, this helps the letter stay firm and it looks nice. For the strips I used a straight stitch. 
Step #5

Put the right sides of the pillow case together and stitch the 2 long side and one short side close. Start stitching from the corner of the long side. Now stitch the fourth side half ways leaving enough space for the pillow to go in. You can hand stitch the opening close or use the machine, it up to you.

 You are all done!!
TA DAA!!

To be honest with you, you can make these any way you like... change the size, color, font, style and if you are feeling confident even the fabric! I used 100% cotton. This tutorial was just to give you an idea.

Stay tuned for our girls version of the monogram pillow!

Wednesday, December 14, 2011

Our home-activities these days

Aside from AR's school, his tracing practice, most of our time is just spent on creative and imaginative play. I have always been a big advocate of arts and crafts as one of the most important tool for young children to learn through. Some mom's have said to me that we don't have time to do too much crafts with kids or some say they just can't stand the mess! Well if one plans on having children, mess is part of the package.

I would recommend this wonderful book to all homeschooling mommy's and also non-homeschooling to encourage them to think of "Art" as an important part of learning and growing. InshaAllah this book will help you all to look at Art in a different way, it will help you see how art promotes critical thinking, problem solving, gives confidence and creative thinking. This book has helped me as much as I found the authors techniques working with my children.
Susan Striker is the author of the famous book "Anti-coloring Book", 200,000 copies of it book have been sold.
I would also like to clarify the concept of art, art doesn't just mean painting on a canvas. When the word 'Art' is used in the concept of learning, it can consist of anything that promotes creative thinking. Like for instance, knitting is an art, sewing is an art, wood work is an art, so on.

These are some things that have been keeping us busy at home.

  • Knitting and crocheting - When I was young I knew how to knit, crochet and also use to make latch hook projects. However, its been years since I had done anything of this sort. I think it was also because when we moved to the west, these things are "grandma's things". Very few institutes and parents encourage  these activities in the west for their children. So for now we are all learning together and will share some of our projects.
  • Mud
  • Weaving - is also another fun activity we are practicing and learning together
  • Lazure wall painting - ALL kids have a dream to scribble or paint on the wall. So here is a great painting techniques, which is safe for children of all ages and they love it. InshaAllah we will be converting one of the Rawdah's wall into a children's masterpiece. (Will post about it later inshaAllah)
  • Small sewing projects
  • Clay
  • Play-stations/stands - We made play-stations around the Rawdah, so they spend sometime on each one.
  • Canopy - We are in a process of making a playstand with a canopy, but for now we are using their igloo tent as a canopy.
  • Nature's touch - We have been renovating their playroom and Rawdah and we tried to add a nature's touch to it. InshaAllah we will be sharing the picture soon.
  • Beeswax modelings by stockmar - It's fun to play with, smells nice, its natural and it can be made soft easily and even I enjoy it. We also have stockmar's crayons, and they are really fun as well.


Saturday, October 29, 2011

Glitter Art


In AR's school they made them memorize the hadeeth "Tahabu Tahadoo" "Give gifts to one another, and you will love one another." He took gifts for his friends and he got lots of gifts as well. One of our favorite thing he got was this....

It was a sticker sheet with glitter on the side. He had to peel a sticker area and then spread the glitter. All three of us enjoyed it a lot. 

Thursday, April 28, 2011

DIY / GIY storage bins

Living in Saudi Arabia I really realized the value of recycling and decomposing facilities that are available in the west. I pray they implement this over here too soon inshaAllah! Although, however, with the recycling system we also tend to recycle a lot of stuff that we can easily re-use one way or another. Today, I will share with you, how I have reused / up-cycled sturdy boxes from things we bought and turned them into storage solutions and homes for varies items. Its always convenient, easy for children and their Baba! to access items when they know where something belongs, keep things from mixing and getting lost.

You will need:
  • Recyclable boxes of different sizes
  • Scissors
  • Contact paper or fabric. We used fabric contact role, which cost us about $7 for a giant role. I was not too particular about the color and design, because the nice design ones were TOO expensive.
  • A pen for marking
  • Decorative ribbons and flowers (optional)
This is a great way to instill eco-consciousness in children as well from a young age. everything doesn't need to be bought. They can even personalize their own storage bins.

For the steps... I will let the pictures do most of the talking.


Sunday, April 3, 2011

Life cycle of a Butterfly


AR's first ever book, illustrated by mama! I have to add that this was lots of fun and it also turned out to be a GREAT learning aid! We are definitely going to be making more inshaAllah.


You will need:

  • Foam paper
  • Permanent marker
  • Hand single hole puncher
  • Fiber yarn (from the rice bag)
  • Colors to color the pictures
  • Construction paper to cut the eggs, leaves and caterpillar out,
  • Stapler

Thursday, March 31, 2011

Popsicle Labels


On the bookshelf I used colored-popsicles and wrote on them with permanent marker. This way all the subjects remain separate and easily accessible. I have all math related books, workbooks, activities and puzzles in one shelf and so on.


I use this "paper tak" to stick things on the walls and things. I like them more then tapes or double sided tapes because it doesn't effect the walls/leave marks on them. They even stick Bristol Boards!!


What are some ways you label your items at home for your children and adults? 

Laminated Labels


We have been working on some labeling items around the house. My goal is to label as many things as possible for ALL the family members to know where things go. For the Rawdah and children's play-room I made labels with pictures to help them see the images and know where something belongs, since they cannot read yet and even H can eventually catch on to the idea. This will inshaAllah be good phonics practice as well.


To tie the labels I used rice bag yarn from the rice we bought to give the labels a shabby vintagy look.


Our color printer is not working so I used pictures from the magazines and did some free-style drawings. We looked for pictures together and then cut & paste them on the labels. This became a good learning experience for AR. I also laminate them to make the more durable.

Car obsession!

AR has 2 obsessions! one is the above and the other is books (alhumdulillah)....when he was younger he loved shoes too but not as much anymore.

We bough him this rug for the Rawdah and...the first thing he thought of doing with it was park cars on it! LOL! I love his creativity on the parking. He called me to show me how he had parked the cars on the carpet and he called it "the color pencil parking lot". I like to sometime plan his lesson around cars...he really enjoys them.

Monday, March 28, 2011

Calendar


Our calendar is Alhumdulillah almost complete now, we still have to add the Arabic months, days and dates to it. I have the months ready from Talibiddeen junior but our color printed is not working with Linux. Here are some details for the details we added to it

    1.   I simply LOVE the fact that I forgot to print the date 17!! That is because it shows (to me at least) its genuity of it, It makes it real for me that WE made it with our hands, and that we are humans and we make mistake and ONLY HE IS PERFECT! (ALLAH SWT)

    2.  We used oil pastels to color the months, days and year. The reason why I chose oil pastels was to give AR a different medium to work with and explore. He specially enjoyed the smudging it with the tissue paper part. I have always loved them.

    3.  We used stencils and acrylic paint for the weekend (Thursday and Friday) to make them stand out and easier for the kids to catch on. now he knows that the blue stencil wine is Friday so on Thursday he gets really excited about Friday Alhumdulillah! He did the stenciling with me too, he choose the wine style and also the colors. I think its really important to let child speak up on there choices even though they might not fit in with the latest trends and styles. A lot of times people focus on fashion and latest Home decor so much that they ignore the child's choice and also and what their comfort!!
    btw, I bought these stencils from DOLLARAMA!!

    4. This is the box of a some frame we had that we used to hold the months and dates. 


    I had to add the stencil to the box too! 
    5.   These the symbol of SPRING!! 


    I made these for our little girl from my some scrap pieces of fabric I got from my tailor who told us that they through them in the GARBAGE!!! I was like WHAT!! The 2 garbage full of fabrics he gave me had meter and meter and a half of pure silks, pure chiffons, cotton, beaded fabric pieces and many more. he beads I had from my bead collections! I have some other projects I am doing using the other fabrics which I will sharing inshaAllah later on. So these are just some of the flowers I put up that I had made of H. 

    I would just like to add, for those who see this and think...we don't have time do these things! I would just like to say that this is ALL done following my 20mins (read here) for the house/me time. It took me a while to finish..."slow and steady wins the race". I cant devote my entire self to all this because I am the cook, cleaner prime caregiver for the kids, laundry woman and now with the new role of a full time (247) on duty teacher/nurture of the kids, it not justifiable. I know, as is the case of most of you as well. 

    After seeing the final result I was content with my 20 mins a day decision Alhumdulillah.