Showing posts with label Crafty corner. Show all posts

Thursday, December 31, 2015

Homemade Beauty: Lip Scrub with kids


Kids made Lip scrub today with 3 ingredients that we already had in our Kitchen. It was a simple and fun project that they really enjoyed, especially the kids. I try to teach kids to make whatever they can at home and from scratch and whenever they can instead of always buying it as the first option. Instilling the idea of being producers rather than consumers is crucial at a young age. AR always has chapped lips so we made these lip scrubs for all of us. These have always helped his chapped lips. H of course love making it since it's a beauty product. Also teaching them that our beloved used to do things himself (Peace and blessing be upon him).

Kid's lip scrub
Here is what we used in the kids version of the scrub:
  • 1 tsp - organic coconut oil
  • 2 tsp - organic cane sugar
  • dash - organic cinnamon 
Adult's lip scrub
Here is what I used for the adults scrub:
  • 1 tsp - organic coconut oil
  • 2 tsp White sugar 
  • 2 drops lavender essential oil
  • 1 drop Eucalyptus
  • Dash of grated lemon 
Optional additions when making it for adults or giving as a gift:
  • Food coloring (gives it a LUSH touch)
  • Coffee
  • Brown sugar instead of cane sugar and white sugar
  • Olive oil
  • Honey

Enjoy the recipe and polish those beautiful smiles!

Stay tuned for more of our Homemade recipes for the whole family.

Saturday, July 4, 2015

InshaAllah we want to start again

Assalamu Aalaikum wa rahmatullahe wa barakatuhu


InshaAllah we are planning on being back on blogging, been MIA for a while, Alhumdulilah. We have been doing a lot of "living" learning!  We learned a lot about Allah's amazing plans. His Divine Decree, Love and Mercy that surrounds us all the time. We are indeed blessed, blessed and blessed over billions. 

So stay tuned InshaAllah. Be'iznillahi Ta'ala (with Allah's permission) 

Ramadan Kareem!


Sunday, October 14, 2012

Hajj Activity #1: DIY Hajj Banner


Last week we made this Hajj banner to welcome the ten best days of the year. The theme of course is Hajj but I also added the Hajj Rituals. Every morning we talk about each place and see some pictures we have from our trips to Arafah, Mina and Muzdalifah. When we did Hajj last year we took AR with us to do Jamarat, so he remembers a lot of the things very clearly.


To make the banner I used felt, needle embroidery floss, a stiring and some templates. Then I cut out the Hajj route (Arafah, Mina, Muzdhalifah and Jamarat) and the sacrificial animals using templates I had printed. You can draw yours if you are good at it. I found the templates easier and faster! I used assorted sizes and colors for the base and glued the sacrificial animals and the Hajj route on them.


AR suggested to write the names of everything on it, of course Mama loved his suggestion and thought of embroiding the names on the base. H is in love with the little felt kaba we had to represent haram.


Banners can be made from any medium, paper, fabric, foam sheets in any design, I chose Grey, yellow, white, black and blue to match our living room colors. Banners can be fun, beautiful decor and educational, H has learned so much about the Hajj with us in the last few days mashaAllah through just being part of the morning Hajj discussion.


Sunday, April 29, 2012

DIY: Wood Math board


A great project to do with kids at home to introduce woodwork. Its a great tool to learn Math through play. It gives children a chance to practice holding yarn and weave it around the nails, they can learn yarn tension before they actually start knitting.

AR helped me mark the wood circle and then hammered the nails in place with me. Then we made many different shapes on it using different colored yarn, I chose bright spring colors to go with our spring theme these days. Even H played with it. 


We got the idea from this video. 


Sunday, April 22, 2012

DIY: Kid's doll sling


A few months ago I made H this baby sling for her dolls, at first she didn't understand it but when I made one for AR and she saw him using it she started enjoying it a lot more. Its a super easy and fun project to do for our girls. I stitched this one with a pattern I have made myself. I also really like this easy tutorial at Progressivepioneer for a different style of a sling, maybe I'll give it a try when H is a bit older.

The whole thing cost $0! I used scraps left over from some other projects. The printed part is cotton and the black is jersey.


I have always wanted one of these baby wraps with both my babies but they were just too out of budget for us both times. Plus we got 3 of those backpack carriers, so we just used that despite the fact I did't really like them. Now that its so worn out, we might get this wrap. Simply love them! I love how the baby has such closeness to the mother/parent compared to the backpack carriers.

Has anyone used one of these baby wraps? How was your experience with them?

Thursday, March 15, 2012

DIY: Baby Doll


I have always wanted to these German dolls (also known as Waldorf dolls) for H, they are very expensive, they cost $130 to $250 a piece. I love this one from Etsy and this one from Nobby Organics.

A month or so ago I had a newsletter in my email about a Doll Making workshop in London Ontario offered by Waldorf in March, for only $95!! Its cheaper then the doll itself! I would love to attend this workshop and make my own dolls for my kids and relatives. Check it out here, if you are interested in taking the workshop and live in Ontario.

Since I had made the felt puppets for story time for the kids (will share inshaAllah), I thought, why not try making a doll. I looked up some tutorials and made my first handmade doll for my doll!! Of course I didn't have all the things needed and neither do I have craft store like Loomis or Micheals to ran to for crafty needs. This was a project that made me pull out my creative side and I was able to complete this doll making project, Alhumdulillah. We are officailly becoming producers from consumers.

Here is how I made in a few steps:

I used a old skin colored t-shirt of mine  from our donation box and  cut out the arms  separately,  torso and legs together and a big circle for the head. I stuffed an old sock of H, (small size) with the filling. and tied it close, and then I tied a strong thread in the middle of it form an head. You can see a curved in line by the eye area. I then cover it with the skin color fabric. If you can get the proper equipment, it come with a tube for the head, which works great and doesn't bunch up at the back. I stitched the arms and body on the machine,  and the kids helped me stuff the whole thing. They are in love with it.
Stitched it all toegther, arms, then the body. Its a very easy project if you have little bit of back ground in stitching you can do it.  It took me total one hour, and i did it over 2 days, and ofcourse the kids were a great help so I had to slow down for them, they stuffed the doll for me, mashaAllah.

Took this old dress of H form the donation box and cut out 2 dresses for H's dolls.


 It cost me $0! and my little doll is so happy with it mashaAllah. Homemade toys can be super frugal!


Knitting away...

I had posted before (Click here) about how we have been knitting and crocheting. So here are some or our projects we have been working on. I will also share some resources that are available to learn knitting and crocheting for beginners. Although I knew how to knit a little bit these tutorials were a great help for those who know how to work with yarn. We will also disscuss why and how we should introduce these skills to our little ones.

There are many reasons why we should introduce knitting to children. I feel its a skill that teaches a great deal of patience (I am talking from experience here!!). Children feel a great accomplished and confidence when they make something with their own hands (and so do adults). It also teaches problem solving, you make mistakes while knitting and you have to correct them with patience. Great for fine motor skills especially in boys. They make amazing gifts for children to give to family, friends and relatives. Its imporatnt to teach our children from the beginning to be producers then consumers as much as we can, also a it frugal.
However, before we start knitting with our children we might want to consider some steps to introducing knitting. I will inshaAllah share with you how I slowly introduced knitting and crocheting to my children step by step, we started in after we came back from our summer vacation, I had brought some tools and yarn back with me, Ihad purchase some stuff here too and it was easily available here too, Alhumdulillah.

1. Be a silent role model - Knit and crochet in front of them, and they will ask you what you are doing, take that opportunity to introduce the yarn, crochet hook or knitting needles. Children are more likely to do things they see parents doing. Whenever we go outside I keep the knitting (or any other) project with me in a drawstring bag, so when we are in the car I work on it while reciting/memorizing with the kids or just looking outside.

2. Getting comfortable - Let them get comfortable with the yarn and other tools by letting them touch them and experiment with them making sure you are with them to be safe.
3. Yarn craft - Doing yarn crafts, glue yarn on paper in different shapes,  paint with yarn, nailed wood panel yarn activity, inshaAllah I'll share this one later. Its a wonder math activity as well. You can also practice cutting yarn, we did a measuring cut yarn activity as well.
4. Introducing knitting - Now that the kids are comfortable with the concept of knitting and yarn, you can start knit with them. And the best way to start is finger knitting! No hooks or needles! From whatever research and asking around I have done, I found that the best age to start knitting with children is ages 6 to 7 but some children can start earlier, if the parents have focused on handwork at an early age. Wood weaving tools are also a great way to start knitting with young children
Here are some of the resources we used to start finger knitting. 
  • Knitting with kids
  • Famly Fun - DIY colorful Jump rope - we are working on this one right now together, we used some old tees and made yarn balls out of them we are still short on old tees. 
  • Video 1 - A boy teaching finger knittiing it was a good way to get him encouraged

  • Video 2 - Earthschooling finger knitting tutorial... love it how she does it with a story. Since AR is still young I keep him in my lap when we knit and we do it together, so far we have just made strings and he's still learning, it a great bonding time for us. We stop as soon as he says I am done, if we are singing then we get many stitches! MashaAllah its really fun!


Resources:

1. Online - Great knitting tutorial for beginners and those who know how to knit a little, uploaded by Cital 86, They have 12 tutotialsand they are very easy to follow

For crocheting these videos are very helpful


2. In person - Find a teacher who can teach you, knitting is very common here in Saudi, I was able to find someone who could teach me but it was not working out so I started using the tutorial I gave above. If you are living in North American you can find cafes and centers where they teach knitting, crocheting and felting and if you have kids they will teach them needle felting as well. Some even offer private class, all that will cost of course and its not always easy to go. Learning in person is a great way, if you can find someone who can teach you for free, that's great!  Knit-o-matic is a great place to start looking into for classes and more info.

3. Buying - In Saudi almost all stationary stores carry knitting tools and yarns. I buy ours from these two online stores, I bought some in summer last year, it has great variety and great prices. 

Here are some things we have made:

My first knit project, A purse for H. MashaAllah TabarakAllaha she loves it and takes it everywhere with her.
Ball for AR
This was a fun and easy knit project. I knit with a garter stitch 6 squares in 3 colors. and with a needle and yarn I hand stitched the pieces together same colors opposite to each other. What you see is the ball inside out, I left the yarn pieces un-cut, they added to the fill.
Turned it inside out and filled it with wool roving until it felt firm, and then stitched it close. The good thing about knitting squares and rectangles is that you can acctually put them together and make so many things about of them, rugs, floor chairs, baby blankets and throws.

A colorful handmade ball!

Baby Bennie for H's doll.

One of the string AR made, this was a gift for H from him.
I felt like making baby booties, so I started..

One completed and still working on the other one, thinking of giving it to preggo friend!

I am making more toys, a rug and a blanket inshaAllah its a slow and long process. I want to inshaAllah make this pouf for our living room (check them out) one day.


Saturday, February 25, 2012

DIY Tutorial: Monogram Pillow Case


Our 'Jummah special' for AR this past Jummah was a handmade monogram pillow cover made by Mama. I think this was by far the best gift he had gotten, his face was glowing mashaAllah, he took it from my hand a hugged the pillow and said "it says A  R mama... JazakaAllah khair" he was just so happy and excited about his new handmade by Mama pillow case.

The pleasure of taking time and making things to give your family and friends is priceless. And when done for  our children its truly worth seeing the expression on their beautiful faces "you MADE this for ME". When my husband came home from Jummah AR ran to him and said "Baba you know Mama made me a special A R pillow case..she made it last night even though she was sooooo tired". My husband and I were suprised to hear what he said, SubhanaAllah children are so caring and loving by fitra (nature)...its our duty as parents to nutrure this fitra they have.

I have always enjoyed makng my own things, I still have a skirt I had stitched in high-school. Last year I had started an etsy store named 'Handmadebits" alhumdulillah made a few sales but it was really taking from my time with the kids becoming a bit challenging from here, so I had to close it for the time and hope to go back up when Allah permits it inshaAllah.

InshaAllah if time permits I'll be sharing some of our previous handmade and future 'Jummah specials' and some tutorials.

Here's the tutorial for the Monogram pillow case. I didn't buy anything for this project, thats the best part!

You will need:

  • Fabric (used or new) for the pillow case or cushion. (I used a fitted  i had lying around)
  • GOOD fabric scissors
  • Printed fabric for the monogram (I used an old dress of H)
  • sewing machine!
  • Iron
How to make it:


Step #1
Cut out two same size fabric pieces (square, rectangle,  circle) . Then iron it, when I stitch I  iron my piece after every stitch, it really helps balancing the whole piece.
Step #2

On a piece of paper draw a picture of how you want your final piece to look like and then stick to it. Trace your monogram letters on a paper free hand or print then if you want it to look perfect. I simply drew them straight on the fabirc with a fabric chalk free hand (you can see the orange marks), it washes of right away. Plus I like the natural look it gives when done free hand.

Step #3
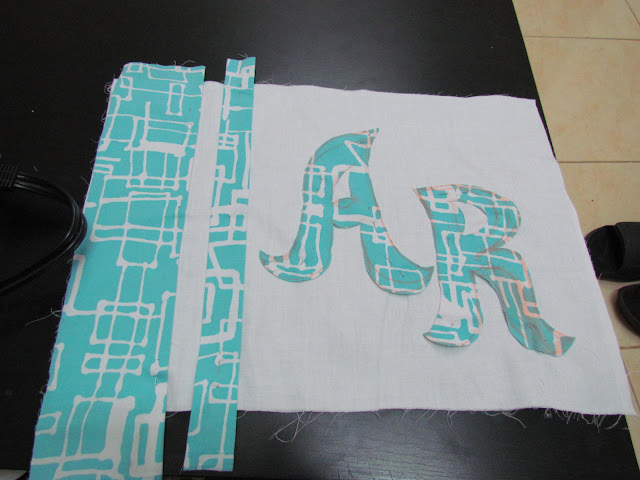
Cut and pin your letters on the right side of the fabric. Design it how you want - you can just put the letters in the middle and leave the rest plain or add stripes on any side to give it some accent it will look amazing regardless...because you made it. If you choose to use trips or fabric for accent make sure you pin it to the fabric as well.
Step #4 
Stitch the letters on by keeping the setting of the machine on the 'zig-zag' stitch, this helps the letter stay firm and it looks nice. For the strips I used a straight stitch. 
Step #5

Put the right sides of the pillow case together and stitch the 2 long side and one short side close. Start stitching from the corner of the long side. Now stitch the fourth side half ways leaving enough space for the pillow to go in. You can hand stitch the opening close or use the machine, it up to you.

 You are all done!!
TA DAA!!

To be honest with you, you can make these any way you like... change the size, color, font, style and if you are feeling confident even the fabric! I used 100% cotton. This tutorial was just to give you an idea.

Stay tuned for our girls version of the monogram pillow!

Wednesday, December 14, 2011

Our home-activities these days

Aside from AR's school, his tracing practice, most of our time is just spent on creative and imaginative play. I have always been a big advocate of arts and crafts as one of the most important tool for young children to learn through. Some mom's have said to me that we don't have time to do too much crafts with kids or some say they just can't stand the mess! Well if one plans on having children, mess is part of the package.

I would recommend this wonderful book to all homeschooling mommy's and also non-homeschooling to encourage them to think of "Art" as an important part of learning and growing. InshaAllah this book will help you all to look at Art in a different way, it will help you see how art promotes critical thinking, problem solving, gives confidence and creative thinking. This book has helped me as much as I found the authors techniques working with my children.
Susan Striker is the author of the famous book "Anti-coloring Book", 200,000 copies of it book have been sold.
I would also like to clarify the concept of art, art doesn't just mean painting on a canvas. When the word 'Art' is used in the concept of learning, it can consist of anything that promotes creative thinking. Like for instance, knitting is an art, sewing is an art, wood work is an art, so on.

These are some things that have been keeping us busy at home.

  • Knitting and crocheting - When I was young I knew how to knit, crochet and also use to make latch hook projects. However, its been years since I had done anything of this sort. I think it was also because when we moved to the west, these things are "grandma's things". Very few institutes and parents encourage  these activities in the west for their children. So for now we are all learning together and will share some of our projects.
  • Mud
  • Weaving - is also another fun activity we are practicing and learning together
  • Lazure wall painting - ALL kids have a dream to scribble or paint on the wall. So here is a great painting techniques, which is safe for children of all ages and they love it. InshaAllah we will be converting one of the Rawdah's wall into a children's masterpiece. (Will post about it later inshaAllah)
  • Small sewing projects
  • Clay
  • Play-stations/stands - We made play-stations around the Rawdah, so they spend sometime on each one.
  • Canopy - We are in a process of making a playstand with a canopy, but for now we are using their igloo tent as a canopy.
  • Nature's touch - We have been renovating their playroom and Rawdah and we tried to add a nature's touch to it. InshaAllah we will be sharing the picture soon.
  • Beeswax modelings by stockmar - It's fun to play with, smells nice, its natural and it can be made soft easily and even I enjoy it. We also have stockmar's crayons, and they are really fun as well.


Thursday, April 28, 2011

DIY / GIY storage bins

Living in Saudi Arabia I really realized the value of recycling and decomposing facilities that are available in the west. I pray they implement this over here too soon inshaAllah! Although, however, with the recycling system we also tend to recycle a lot of stuff that we can easily re-use one way or another. Today, I will share with you, how I have reused / up-cycled sturdy boxes from things we bought and turned them into storage solutions and homes for varies items. Its always convenient, easy for children and their Baba! to access items when they know where something belongs, keep things from mixing and getting lost.

You will need:
  • Recyclable boxes of different sizes
  • Scissors
  • Contact paper or fabric. We used fabric contact role, which cost us about $7 for a giant role. I was not too particular about the color and design, because the nice design ones were TOO expensive.
  • A pen for marking
  • Decorative ribbons and flowers (optional)
This is a great way to instill eco-consciousness in children as well from a young age. everything doesn't need to be bought. They can even personalize their own storage bins.

For the steps... I will let the pictures do most of the talking.


Wednesday, April 20, 2011

Up-cycled: Flower Box


So I bought this box on sale for ONLY 6 riyals, slightly damaged, decided to up-cycle it by covering the burn on the lid.


This makes perfect storage for our future fabric flower projects, inshaAllah. 

I have a book on how to make different types of flowers from fabric, felt, ribbon and paper and some childhood experience. There are many wonderful blogs with tutorials teaching how to make flowers. Here is a link to one, she has a tutorial for a ribbon rose, you can use the same tutorial for fabric. The turquoise flower I made is the similar style but with a long piece of 2 inch wide fabric. Enjoy!

BTW, this is another project done sticking to the 20 mins a day rule, Alhumdulillah.